
A brief tutorial how to upcycle old boots with straight block heels to look trendy.
- Repair Your Heels for Cheap
- What You Will Need to Upcycle Old Boots with Block heels
- How to Make Jeweled Heels
- Finishing Touches of Heel Embellishment DIY Project
- How I Styled These Trendy Heels
- More DIY and Recycling Ideas on High Latitude Style
Disclosure: This post has affiliate links.
Repair Your Heels for Cheap
Some of you may remember my post on my closet clean-out. See the link in case you missed it. In the post, I gave examples on what to toss and what is worth to repair. I identified a pair of boots with distressed heels as worth the effort to repair them. Since Fairbanks again has no cobbler, I had to do it myself. I decided to jump the bandwagon on this fall’s trend of “jeweled heels.” In this post, I will explain how I up-cycled my old boots into trendy statement boots. The best, when the trend is over, it is easy to remove the decoration and replace it with leather. Low risk, high reward.

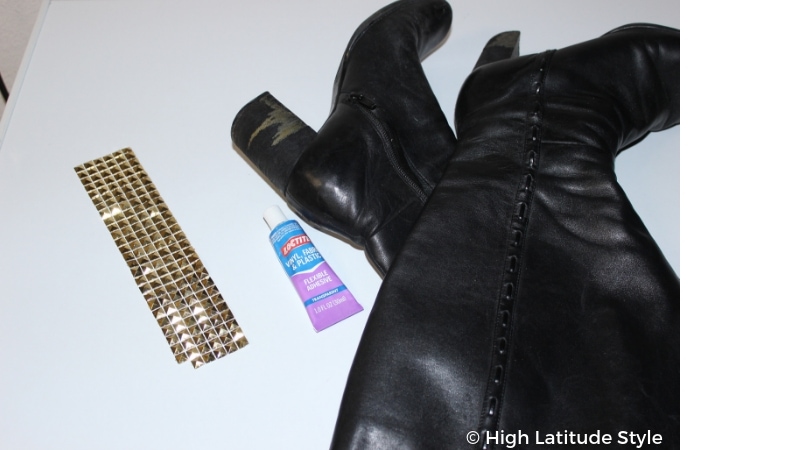
What You Will Need to Up-Cycle Old Boots with Block Heels
- Plastic clue
- An iron cleaning brush
- Studs or other decoration best as a band like shown in the photo below (Tip: Buy the band twice the length of the circumference of the heel in about the width of the height of the heel)
- Paint to color the rest of the heel where needed
- A small paint brush
- A pair of scissors
- 15 minutes of undisturbed time
How to Make Jeweled Heels
Clean the distressed heels from soil, loose leather and dirt. Use a steel brush to roughen the surface so the clue gets a good grasp. When working on the first heel, I put the clue onto the decoration band. However, some clue went thru the grid, dripped and changed the color of some studs to looking silver. Thus, for the second galosh I put the clue on the heel. This procedure worked better and didn’t cause discolorations. I later painted the discolored studs gold to fix the mishap.


Finishing Touches of Heel Embellishment DIY Project
After the clue had dried, I painted the remainder of the heel gold. Of cause you can also go for a decoration band that can be cut to measure for the heel. Then you won’t have to do the painting. However, this doesn’t work with plastic studs that are hollow inside.

Tip: When you use a material that can be cut in which ever way you want/need to cut it, I would recommend to create a paper pattern of the heel surface. This way it is easier and safer to cut the material than doing it directly.
Like this project? Then pin it to your DIY Pinterest board as a reminder when your heels need “help”.
How I Styled These Trendy Heels
I wore the up-cycled beauties for the first time with a little black dress and a statement belt. A pair of leopard print gray and black tights served to create interest. It’s interesting how gray looks light compared to black. Isn’t it?


More DIY and Recycling Ideas on High Latitude Style
Did you know that you can find many posts on this blog about other DIY projects like how to
- Revive an old shirt into a summer skirt,
- Dye a blazer,
- Make a patched shirt, or
- Shorten a high low hem dress,
just to mention a few.
P.S. Check for Discounts, Coupons, and Promo Codes.
Photos of me: G. Kramm
Other photos: N. Mölders
© 2013-2025 Nicole Mölders | All rights reserved


Wow, Nicole, what a beautiful outcome! Genius!! – Angie
The boots were still totally fine except that they had damaged heels.
It only works for block heels. Keep that in mind.
Nicole…I didn’t realize you had enabled comments!! This is such a great idea for scuffed heels….I’m going to remember this!!
XOOX
Jodie
a brilliant and excellent idea.